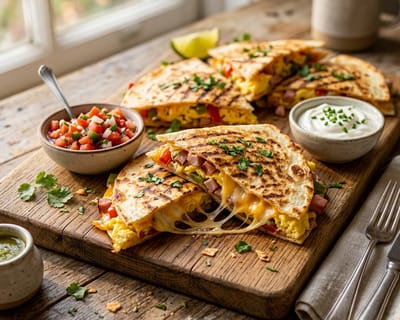
Ham and Pepper Breakfast Quesadillas

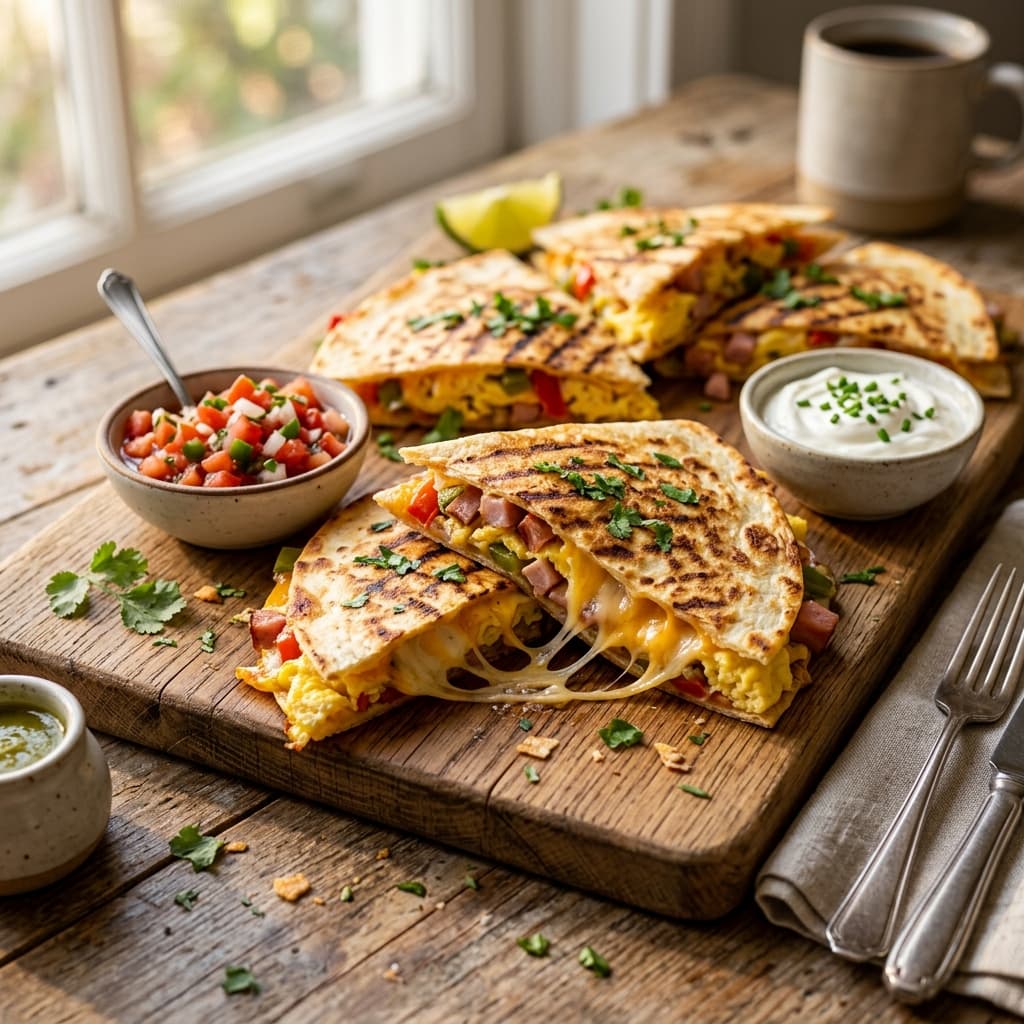
Crispy golden flour tortillas packed with savory diced ham, sautéed bell peppers, sweet red onions, fluffy scrambled eggs, and melted Monterey Jack and sharp cheddar cheese.
Key Takeaways
- ✓Ready in just 20 mins using straightforward, kitchen-tested technique.
- ✓Delivers 28g of muscle-fueling protein per serving for lasting satiety.
- ✓Portion-balanced at 480 calories per serving with wholesome, unrefined ingredients.
- ✓Masterclass temperature checkpoints ensure maximum tenderness and flavor development.
The Story
Crispy golden flour tortillas packed with savory diced ham, sautéed bell peppers, sweet red onions, fluffy scrambled eggs, and melted Monterey Jack and sharp cheddar cheese.
The Anatomy of a Perfect Breakfast Quesadilla
A morning quesadilla brings together elements of a classic American diner scramble and the griddled crispness of Mexican street fare. When prepared thoughtfully, it provides crisp textural contrast: blistered, flaky exterior dough yielding to creamy, soft-set egg curds, salty cured ham, sweet caramelized bell peppers, and stretchy melted cheese.
Too often, home cooks treat the breakfast quesadilla as an indiscriminate dumping ground for leftover breakfast components. The result is inevitably disappointing: a steamed, rubbery tortilla that sags in the center, weeping liquid across the cutting board while releasing pockets of unmelted cheese and rubbery, overcooked eggs. Achieving diner-grade results requires understanding thermal transfer, moisture migration, and fat emulsion during pan searing.
By par-cooking the aromatic vegetables to expel internal steam, soft-scrambling the eggs so they finish cooking only when the tortilla crisps, and layering the shredded cheeses systematically to construct an internal water barrier, you transform simple morning staples into a dish with distinct layers of flavor and texture.
Ingredient Selection and Culinary Rationale
Each ingredient in this recipe serves a functional physical role beyond basic seasoning. Careful selection ensures the quesadilla holds its structural integrity from the hot skillet to the cutting board.
Flour Tortillas (10-Inch Burrito or Soft Taco Size)
Choose standard flour tortillas made with lard or vegetable shortening rather than whole wheat or low-carb alternatives. High-gluten flour tortillas offer the tensile elasticity required to fold without splitting along the seam. The shortening laminated into the dough creates microscopic air pockets during pan frying, producing a blistered surface that shatters cleanly under a knife rather than tearing apart.Cured Ham
Thick-cut country ham, leftover holiday spiral ham, or thick-sliced deli tavern ham delivers savory depth and concentrated salinity. Avoid watery, water-added boiled deli ham slices; as they heat, they discharge phosphates and saline moisture directly into the egg matrix, causing sogginess. Dicing the ham into precise quarter-inch cubes allows it to distribute evenly among the eggs and cheese rather than slipping out in large sheets when bitten.Bell Peppers and Sweet Onions
A combination of red bell pepper and sweet yellow onion brings sweetness and color. Bell peppers contain roughly ninety-two percent water by weight. If introduced raw into a quesadilla, that water discharges into the center of the tortilla during cooking. Sautéing the diced vegetables over medium-high heat evaporates their moisture and concentrates their natural sugars through gentle Maillard browning, yielding tender bites with concentrated sweetness.Fresh Large Eggs
Farm-fresh large eggs provide richness and structural protein. Because eggs continue to firm up under residual heat, they must be cooked to a soft, glossy curd before assembly. Leaving the curds slightly underdone guarantees that the secondary heat from the skillet during quesadilla crisping brings them to peak tenderness rather than turning them rubbery.The Dual-Cheese Blend: Monterey Jack and Sharp Cheddar
A successful quesadilla relies on two cheese profiles: one for meltability and one for assertive flavor. Monterey Jack melts evenly at 130°F (55°C) thanks to its moisture content and young age, providing stringy elasticity without oiling off. Sharp cheddar provides lactic acidity, nuttiness, and color. Grating your own cheese from cold blocks is essential; commercial anti-caking starches prevent cheese strands from coalescing into a unified, protective matrix.Equipment Needed for Griddle Success
You do not need specialized restaurant equipment to produce crisp breakfast quesadillas, but choosing the right pan makes a substantial difference in heat distribution:
- Heavy Cast-Iron Skillet or Carbon Steel Griddle (12-Inch): Cast iron retains substantial thermal mass. When a cold, loaded tortilla hits the preheated iron, the surface temperature remains steady, blistering the tortilla quickly before heat can dry out the interior scrambled eggs.
- Non-Stick Skillet (10-Inch): Required for cooking the eggs into delicate, unbroken curds without scorching or tearing.
- Wide Metal Spatula or Fish Turner: A wide spatula supports the full weight of the folded quesadilla, allowing you to flip without spilling ingredients into the pan.
- Chef's Knife and Cutting Board: For dicing ham and vegetables into uniform sizes and slicing the finished quesadilla cleanly.
The Science of Moisture Control in Griddled Sandwiches
The chief enemy of any toasted wrap or quesadilla is moisture migration. When heat is applied to the exterior of the tortilla, water molecules inside the fillings heat up and convert into steam. If that steam cannot escape, it condenses against the inner surface of the tortilla, dissolving the flour starch and turning the bread gummy and wet.
To prevent this issue, observe three fundamental culinary principles:
1. The Pre-Evaporation Step
Every moist vegetable must be fully cooked in advance. Cooking the diced bell peppers until their skins slightly blister and their flesh turns tender ensures that the bulk of their intracellular water has been driven off before they encounter the tortilla.2. The Cheese Barrier Shield
Cheese is an emulsion of milk fat, water, and milk proteins. When melted, fat is hydrophobic—meaning it repels water. By placing a solid layer of shredded cheese directly on the raw tortilla face before adding the eggs and vegetables, and topping the fillings with another layer of cheese before closing the tortilla, you enclose the moist scramble inside a protective fat shell. As the skillet heats the bottom and top, the cheese melts first, sealing the flour dough from any moisture escaping the eggs.3. Skillet Venting
Never cover the skillet with a tight-fitting lid while toasting the tortilla. While a lid does melt cheese faster, it traps escaping steam inside the skillet pan. That steam condenses on top of the tortilla, ruining any crisp exterior. Cook uncovered over controlled medium-low heat to let moisture dissipate freely while the bottom browns steadily.Step-by-Step Instructions
Follow these clear, sequential directions to create four generous, golden-crisp breakfast quesadillas.
Step 1: Prepare and Dice the Fillings
Dice 8 ounces of thick-cut cooked ham into uniform 1/4-inch cubes. Wash, core, and seed 1 large red bell pepper, then dice into 1/4-inch pieces. Finely chop 1/2 medium yellow onion. Freshly grate 1 cup of Monterey Jack cheese and 1 cup of sharp yellow cheddar cheese, then toss them together in a bowl.Step 2: Sauté the Bell Peppers and Onions
Place a skillet over medium heat and add 1 tablespoon of olive oil. Add the diced bell peppers and onions along with 1/4 teaspoon of kosher salt and a pinch of black pepper. Sauté for 5 to 6 minutes, stirring frequently, until the onions become translucent and the peppers soften with slightly blistered edges. Transfer the cooked vegetables to a plate and spread them out to cool slightly.Step 3: Crisp the Diced Ham
Return the skillet to medium heat and add the diced ham. Sauté for 3 to 4 minutes until the edges of the ham cubes develop light golden browning. Remove the ham from the skillet and set it alongside the cooked vegetables. Wipe out any rendered ham drippings from the pan with a dry paper towel.Step 4: Soft-Scramble the Eggs
Crack 6 large eggs into a mixing bowl. Add 2 tablespoons of whole milk or heavy cream, 1/4 teaspoon of kosher salt, and 1/4 teaspoon of freshly ground black pepper. Whisk vigorously for 45 seconds until uniform and slightly frothy. Place a 10-inch non-stick skillet over medium-low heat and melt 1 tablespoon of unsalted butter. Pour in the eggs. Using a heat-resistant silicone spatula, gently sweep across the bottom of the pan to create large, soft curds. Remove from heat while the eggs are still glossy and slightly wet (approximately 2 to 3 minutes). They will finish cooking inside the quesadilla.Step 5: Assemble the Quesadilla Halves
Lay two 10-inch flour tortillas flat on a clean work surface. On one half of each tortilla, scatter 2 tablespoons of the shredded cheese blend. Layer on one-quarter of the soft-scrambled eggs, one-quarter of the sautéed peppers and onions, and one-quarter of the browned ham. Top the fillings evenly with another 2 tablespoons of shredded cheese. Fold the bare half of each tortilla over the filled side to form a tight half-moon crescent. Repeat the process for the remaining two quesadillas.Step 6: Toast to Golden Crispness
Place a 12-inch cast-iron skillet or heavy griddle over medium heat. Dip a folded paper towel into a teaspoon of neutral cooking oil and rub the skillet surface lightly to create a thin sheen. Place one or two folded quesadillas in the skillet, curved edges facing outward. Cook undisturbed over medium-low heat for 3 to 4 minutes, until the bottom tortilla turns deep golden brown and feels crisp when prodded with a spatula.Step 7: Flip and Melt the Interior
Carefully slide a wide metal spatula underneath the quesadilla, supporting the folded seam, and gently flip it over. Cook the second side for another 2 to 3 minutes, pressing down lightly with the spatula to encourage even contact and complete cheese melting.Step 8: Rest, Slice, and Serve
Transfer the toasted quesadillas to a cutting board and let them rest for 2 minutes. This resting window allows the melted cheese to firm up slightly so the fillings do not squeeze out when cut. Using a large chef's knife or a rolling pizza cutter, slice each half-moon into three triangular wedges. Serve immediately with fresh pico de gallo, sour cream, and sliced avocado.Culinary Variations and Flavor Twists
Nutritional Breakdown
The nutritional profile of these breakfast quesadillas makes them an energizing, protein-packed start to the day. High-biological-value protein from eggs and ham supports lean muscle maintenance, while dietary fats from whole cheese supply sustained morning satiety.
| Metric | Per Serving (1 Half-Moon Quesadilla) | Daily Value (%) |
|---|---|---|
| Calories | 480 kcal | 24% |
| Protein | 28 g | 56% |
| Total Carbohydrates | 32 g | 11% |
| Dietary Fiber | 2.5 g | 9% |
| Total Fat | 26 g | 33% |
| Saturated Fat | 12 g | 60% |
| Cholesterol | 325 mg | 108% |
| Sodium | 980 mg | 43% |
| Calcium | 380 mg | 29% |
| Iron | 2.8 mg | 16% |
Skillet Heat Regulation and Surface Browning Mechanics
Managing your cooking heat during the final pan sear makes the difference between a golden, crisp quesadilla and one that is either burnt or soft. When toasting a filled flour tortilla, heat must conduct through the outer starch layer, melt the interior cheese, and warm the eggs and vegetables without scorching the flour.
Understanding Surface Conduction
Flour tortillas contain starches, proteins, and fats. When placed on a heated surface between 325°F and 350°F (163°C to 177°C), the exterior undergoes Maillard reactions, producing pleasant toasted aromas and a pale amber crust. If the surface exceeds 400°F (204°C), the dry flour dusting present on commercial tortillas chars quickly, creating acrid black specks before the internal cheese matrix reaches its melting point of 130°F (55°C).Maintain your burner at medium-low. Allow the heavy cast-iron pan to heat evenly for at least 4 to 5 minutes before adding the first tortilla. You want steady, gentle conduction that allows warmth to penetrate inward.
Pressing Technique for Uniform Contact
Tortillas are rarely perfectly flat; as air pockets heat up, the dough can bubble upward, lifting portions of the bottom away from the pan. Use a wide, flat metal spatula or a flat burger press to apply gentle, even downward pressure across the top of the folded quesadilla during the first minute on each side. This contact ensures the entire bottom surface browns uniformly and prevents pale, un-toasted centers.Complementary Sauces and Side Pairings
While this breakfast quesadilla is satisfying on its own, thoughtful condiments provide bright acidity and creaminess that balance the savory cured ham and melted cheese:
Roasted Tomato-Serrano Salsa
Char 3 Roma tomatoes and 1 serrano pepper under the broiler until skins blister and blacken. Blend with 1/4 cup chopped cilantro, 1 minced garlic clove, 1 tablespoon fresh lime juice, and 1/2 teaspoon kosher salt. The smoky charred notes echo the crisped ham and toasted tortilla.Lime-Cilantro Crema
Whisk 1/2 cup of Mexican crema or sour cream with the zest and juice of 1 lime, 1 tablespoon of finely minced fresh cilantro, and a pinch of salt. The lactic acidity cuts through the melted cheese and cleanses the palate between bites.Pickled Red Onions
Thinly slice 1 red onion and steep in a warm mixture of 1/2 cup apple cider vinegar, 1/2 cup water, 1 teaspoon sugar, and 1 teaspoon salt for 30 minutes. Strewing a few crisp pink rings over each sliced wedge adds a bright vinegar pop and visual contrast.Ham and Pepper Breakfast Quesadillas
Crispy golden flour tortillas packed with savory diced ham, sautéed bell peppers, sweet red onions, fluffy scrambled eggs, and melted Monterey Jack and sharp cheddar cheese.
Macro Nutrition Profile (Per Serving)
Ingredients
Ingredient Substitutions
| Original Ingredient | Healthy Alternative |
|---|---|
| Animal protein | Firm tofu, tempeh, or organic chickpeas |
| Cooking fat | Extra virgin olive oil or grass-fed butter |
Instructions
Prepare and Dice the Fillings: Dice 8 ounces of thick-cut cooked ham into uniform 1/4-inch cubes. Wash, core, and seed 1 large red bell pepper, then dice into 1/4-inch pieces. Finely chop 1/2 medium yellow onion. Freshly grate 1 cup of Monterey Jack cheese and 1 cup of sharp yellow cheddar cheese, then toss them together in a bowl.
Sauté the Bell Peppers and Onions: Place a skillet over medium heat and add 1 tablespoon of olive oil. Add the diced bell peppers and onions along with 1/4 teaspoon of kosher salt and a pinch of black pepper. Sauté for 5 to 6 minutes, stirring frequently, until the onions become translucent and the peppers soften with slightly blistered edges. Transfer the cooked vegetables to a plate and spread them out to cool slightly.
Crisp the Diced Ham: Return the skillet to medium heat and add the diced ham. Sauté for 3 to 4 minutes until the edges of the ham cubes develop light golden browning. Remove the ham from the skillet and set it alongside the cooked vegetables. Wipe out any rendered ham drippings from the pan with a dry paper towel.
Soft-Scramble the Eggs: Crack 6 large eggs into a mixing bowl. Add 2 tablespoons of whole milk or heavy cream, 1/4 teaspoon of kosher salt, and 1/4 teaspoon of freshly ground black pepper. Whisk vigorously for 45 seconds until uniform and slightly frothy. Place a 10-inch non-stick skillet over medium-low heat and melt 1 tablespoon of unsalted butter. Pour in the eggs. Using a heat-resistant silicone spatula, gently sweep across the bottom of the pan to create large, soft curds. Remove from heat while the eggs are still glossy and slightly wet (approximately 2 to 3 minutes). They will finish cooking inside the quesadilla.
Assemble the Quesadilla Halves: Lay two 10-inch flour tortillas flat on a clean work surface. On one half of each tortilla, scatter 2 tablespoons of the shredded cheese blend. Layer on one-quarter of the soft-scrambled eggs, one-quarter of the sautéed peppers and onions, and one-quarter of the browned ham. Top the fillings evenly with another 2 tablespoons of shredded cheese. Fold the bare half of each tortilla over the filled side to form a tight half-moon crescent. Repeat the process for the remaining two quesadillas.
Toast to Golden Crispness: Place a 12-inch cast-iron skillet or heavy griddle over medium heat. Dip a folded paper towel into a teaspoon of neutral cooking oil and rub the skillet surface lightly to create a thin sheen. Place one or two folded quesadillas in the skillet, curved edges facing outward. Cook undisturbed over medium-low heat for 3 to 4 minutes, until the bottom tortilla turns deep golden brown and feels crisp when prodded with a spatula.
Flip and Melt the Interior: Carefully slide a wide metal spatula underneath the quesadilla, supporting the folded seam, and gently flip it over. Cook the second side for another 2 to 3 minutes, pressing down lightly with the spatula to encourage even contact and complete cheese melting.
Rest, Slice, and Serve: Transfer the toasted quesadillas to a cutting board and let them rest for 2 minutes. This resting window allows the melted cheese to firm up slightly so the fillings do not squeeze out when cut. Using a large chef's knife or a rolling pizza cutter, slice each half-moon into three triangular wedges. Serve immediately with fresh pico de gallo, sour cream, and sliced avocado.
Tried this recipe?
Let us know how it turned out! Click a star below to leave a review and rate the recipe.
Storage & Freezing Tips
- Refrigerator: Store in an airtight container for up to 2 days. Keep the components separate if possible to preserve texture.
- Reheating: Reheat gently in a skillet on medium-low heat with a splash of olive oil or butter.
- Freezing: Freezing is not recommended for this dish because ingredients like eggs become soggy, rubbery, or mushy when defrosted.
Frequently Asked Questions
Can this recipe be prepared ahead of time?▼
Yes, this meal is excellent for weekly meal prep. Store components separately and assemble before serving.
Is this recipe gluten-free?▼
All ingredients used are naturally gluten-free. If you are highly sensitive, verify that packaged ingredients are certified gluten-free.
Tried this recipe?
Tag @stewartlucas on Instagram and hashtag it #nutriguide!
You Might Also Like
Stewart Lucas
Chief Culinary SpecialistStewart Lucas is the Chief Culinary Specialist and lead recipe developer representing the NutriGuide team. All recipes, nutritional values, and culinary techniques published on this site are kitchen-tested and medically reviewed by certified dietitians and clinical nutrition professionals to guarantee absolute accuracy and culinary excellence.
Community Reviews
Please log in to leave a review.